How to setup Sentry for different use cases
Overview
This page describes the steps required to configure a Sentry sensor. Explaining the various configuration settings and their use will guide the user through the setup procedures and how to maximize the battery life. The first step in setting up notifications is to configure what notification types the system will act on.
The iMatrix System allows each user to control notifications. Users can manage these settings on their Notification Settings page. The settings page is accessed by selecting the “Settings” item from the main menu or Clicking on the user avatar on the top right and selecting “Settings”. The following screen capture shows the iMatrix Cloud System WEB UI settings.
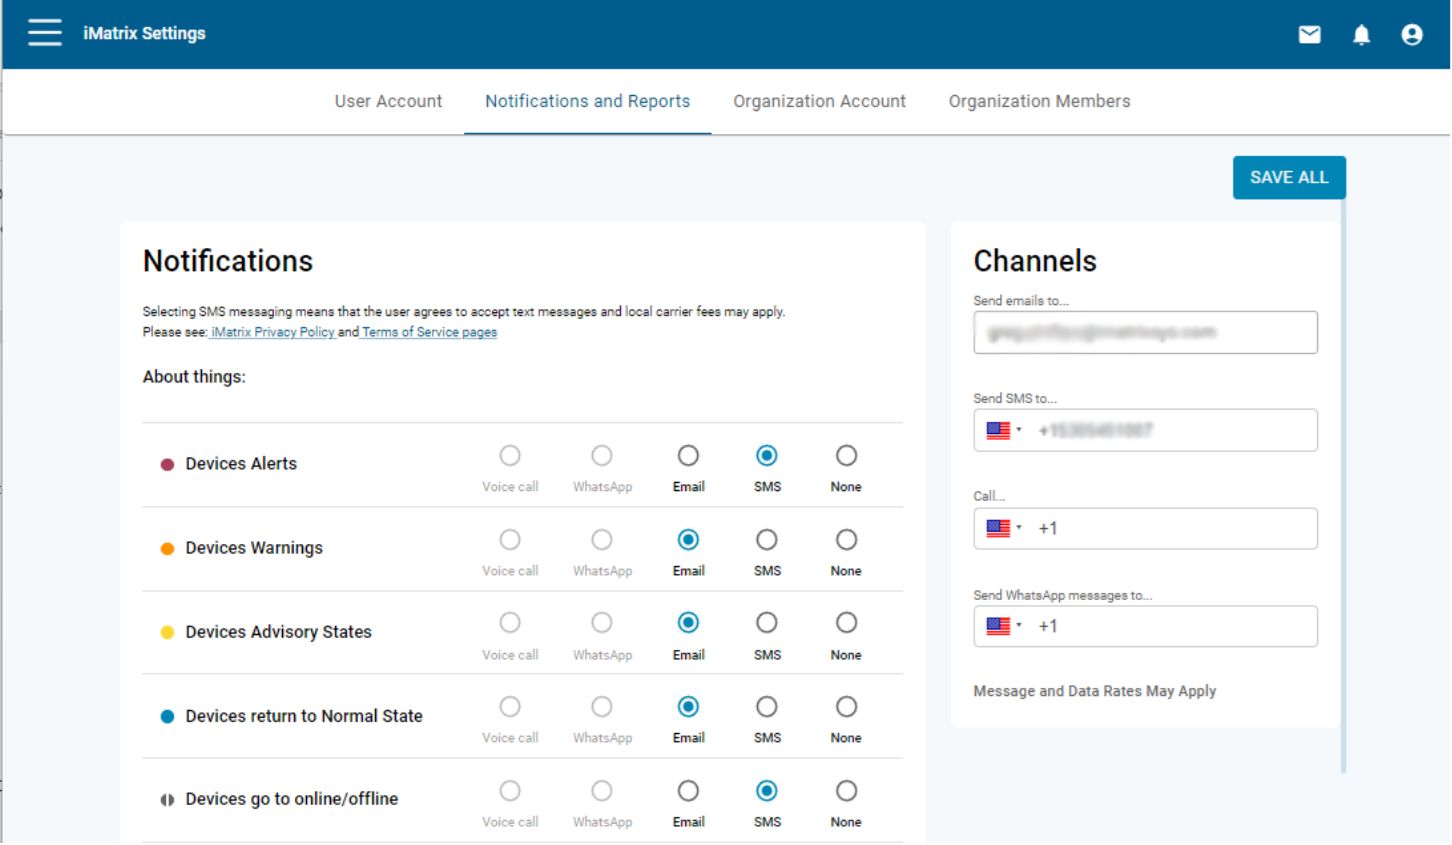
On the right side, the Channels selection allows you to set the destination for notifications. The inquiries default to the user’s details, but you can customize it to send notifications to other users . Voice calls, and Whatsapp notifications are on the road map.
To access the Notifications settings from the Mobile App, Use the main menu to access the “Settings” page. Then select the “Notification Settings”.
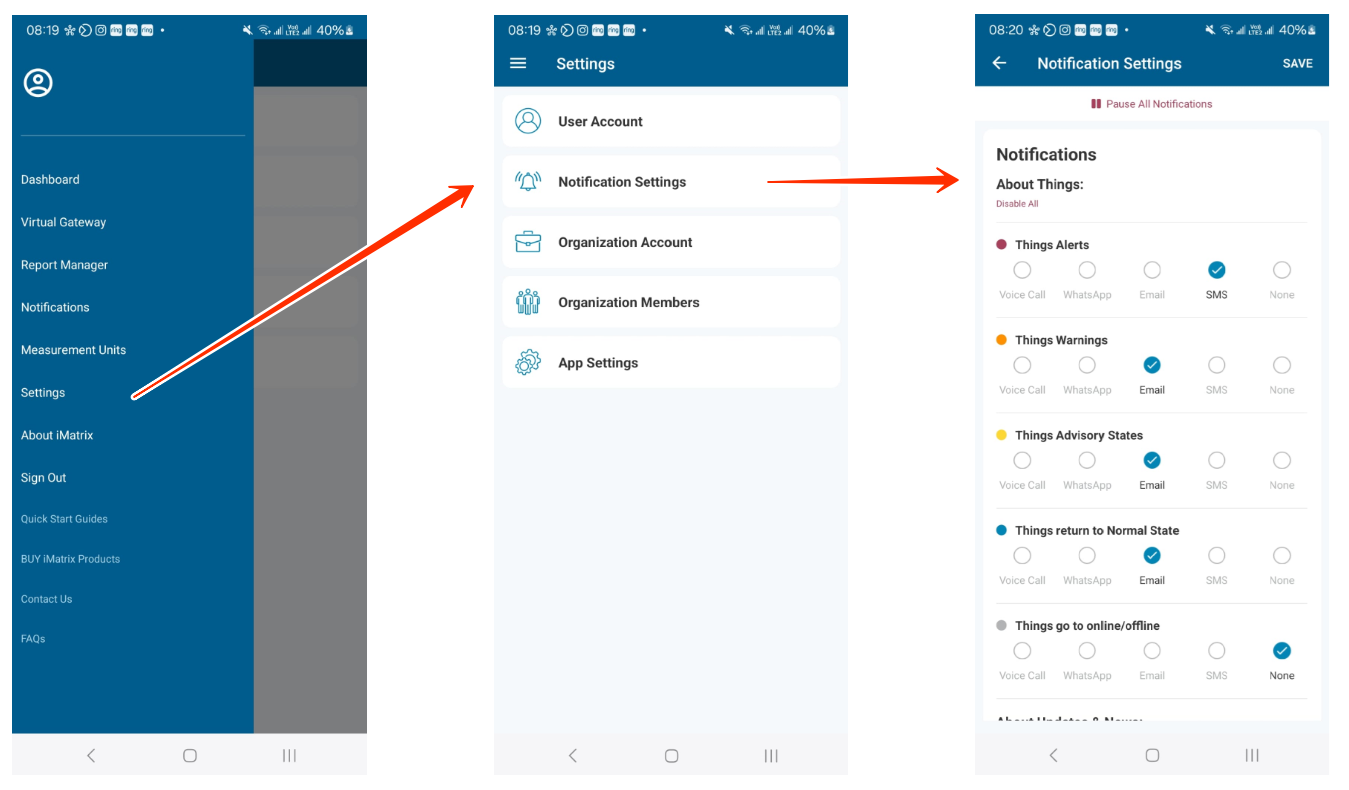
In the notification settings, the system shows the three notification types and the selected notification method. The default is None.
Device Notification Settings
The system shares the notification settings structure across all iMatrix products. Most sensors have multiple levels; for example, a temperature sensor has an almost infinite set of values. This way, each sensor’s parameters have three notification levels for low and high readings. These settings allow the user to tailor the severity level based on the high or low level. For example, a user may elect to get email messages for advisory and warning levels and then get an SMS message for Alerts.
Some devices only have positive values; the Sentry’s Open Duration parameter is one of these. These devices only show the high-limit settings for notifications.
Another particular case is devices that have stateful sensors. Sentry has a stateful parameter, Open Event. The states are Unset (unknown), Opened and Closed.
All of these settings correspond to the parameters on the device settings page. See the following settings for a Sentry unit’s “Open Events”, and “Open Duration” parameters.
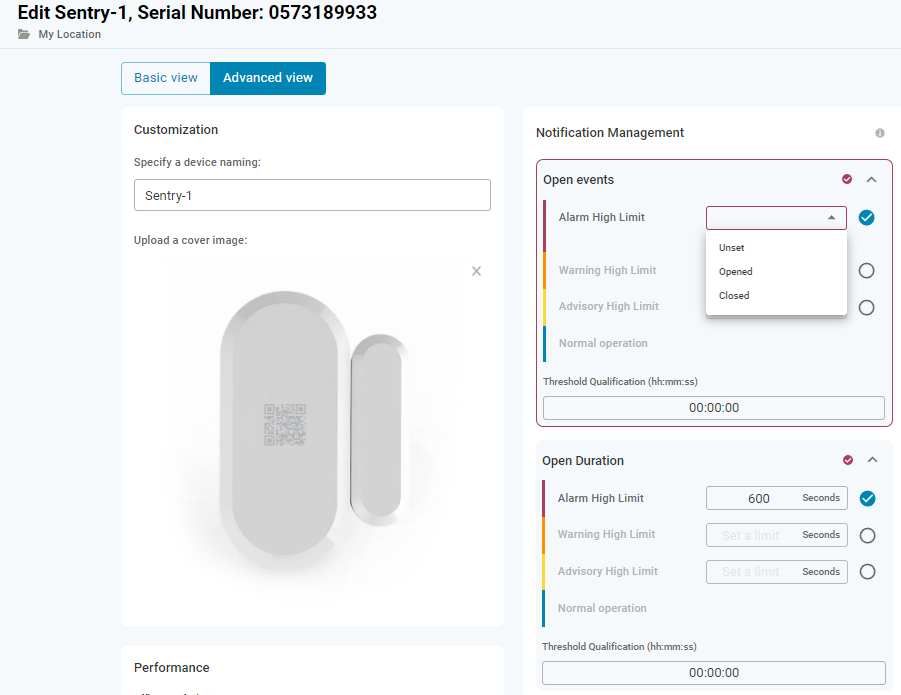
Each parameter has an additional setting for “Threshold Qualification”. Typically, we use this additional setting for parameters like temperature, ignoring false positives until the value has settled above the threshold level for the required period.
Setting an Alert for Extended Open
To set the Sentry notification for an extended open time, check the notifications settings outlined above to ensure that the correct notification type is selected.
As with many aspects of the iMatrix System, there are many ways to meet your needs. There are two ways to set an alarm for an extended open. The first is the recommended method.
- Set the Alarm High Limit to the value needed. The example above shows this setting.
- Set the Alarm High Limit to “Opened” for the Open Event and add a Threshold Qualification time to the setting.
Once set in the WEB UI or Mobile App, the system will send a message to the Sentry, instructing it to notify whenever this condition occurs. The Gateway monitoring the Sentry will detect this notification and pass it to the iMatrix Cloud. The iMatrix Cloud will then send the message over the selected channel to the designated user.
The following is an example of a Sentry monitoring a freezer door.
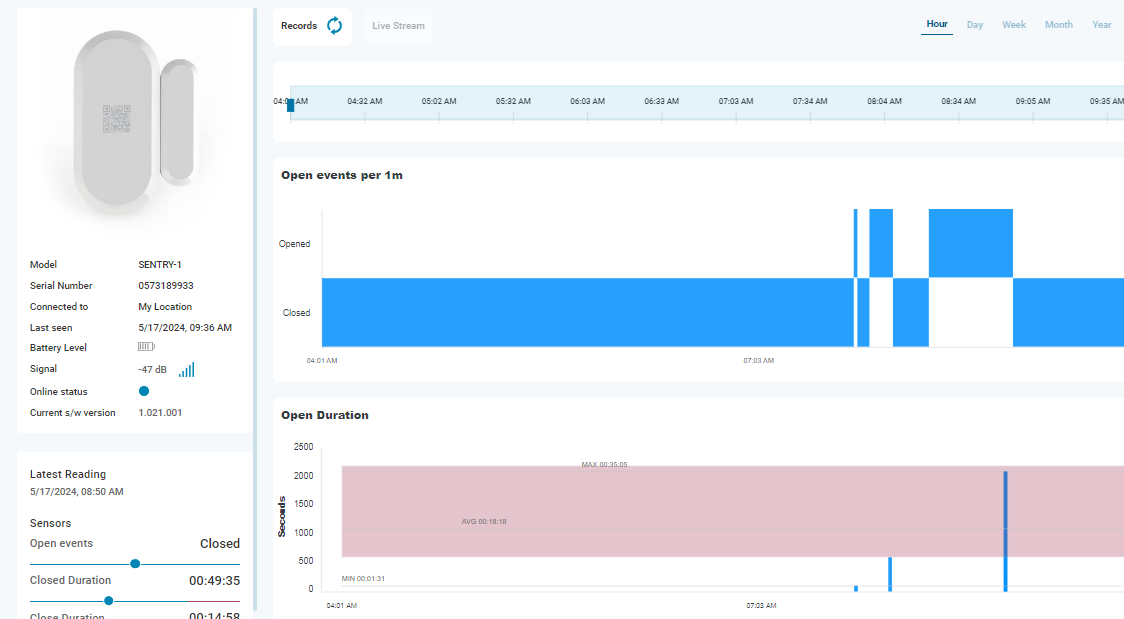
There are some interesting things to observe in this example. During this period, someone opened the door three times. The first was very short, and the second was 9 minutes and 48 seconds. Using the “hover over” function with the mouse, the UI pops up the message. See the following image.

In the third case, someone opened the door for 35 minutes and 5 seconds. The alarm level bands shown on the graph clearly show that the time exceeded the alarm notification level of 600 seconds (10 Minutes).
The following image shows the exact time, again using the “Hover Over” mouse function.

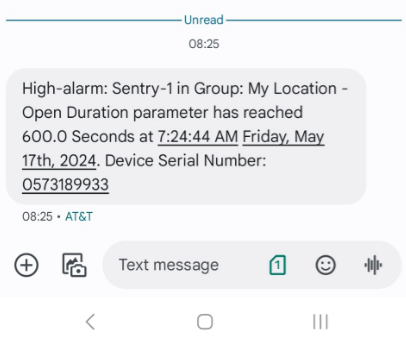
The user set the Sentry notifications for an alarm condition to “SMS”. The following screen capture shows the text message sent to the user.
Setting an Alert for Extended Close
A 24-hour airport retail kiosk could use an alert for an Extended Close operation. In this case, a worker is allowed a fifteen-minute bathroom break once during their 4-hour shift.
Setting notifications for any closed event longer than fifteen minutes ensures management has a documented way to record abuse of these break times.
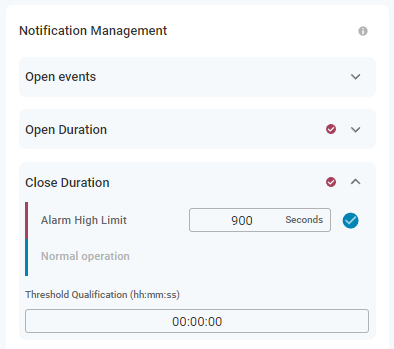
To set a notification for a Closed duration exceeding 15 minutes (15 x 60 = 900 seconds), use the “Closed Duration” parameter.
The following screen capture illustrates the correct setting.
Using Open Count per Period
The open count per period is valuable for monitoring the activity through an entrance or exit door.
The Sentry reports the number of open counts over the designated period. Use the Open Count parameter on the Sentry setting page to select the period.
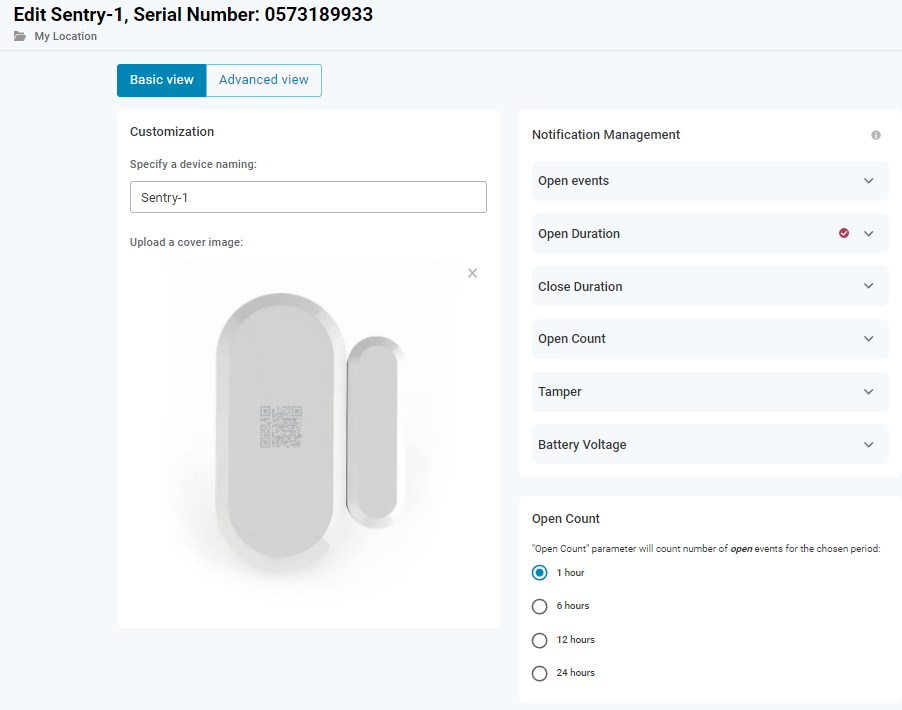
The recommended setting for monitoring activity uses the count per-hour setting. When monitoring a bathroom that may need cleaning, a count per six or more hours may be a better value.
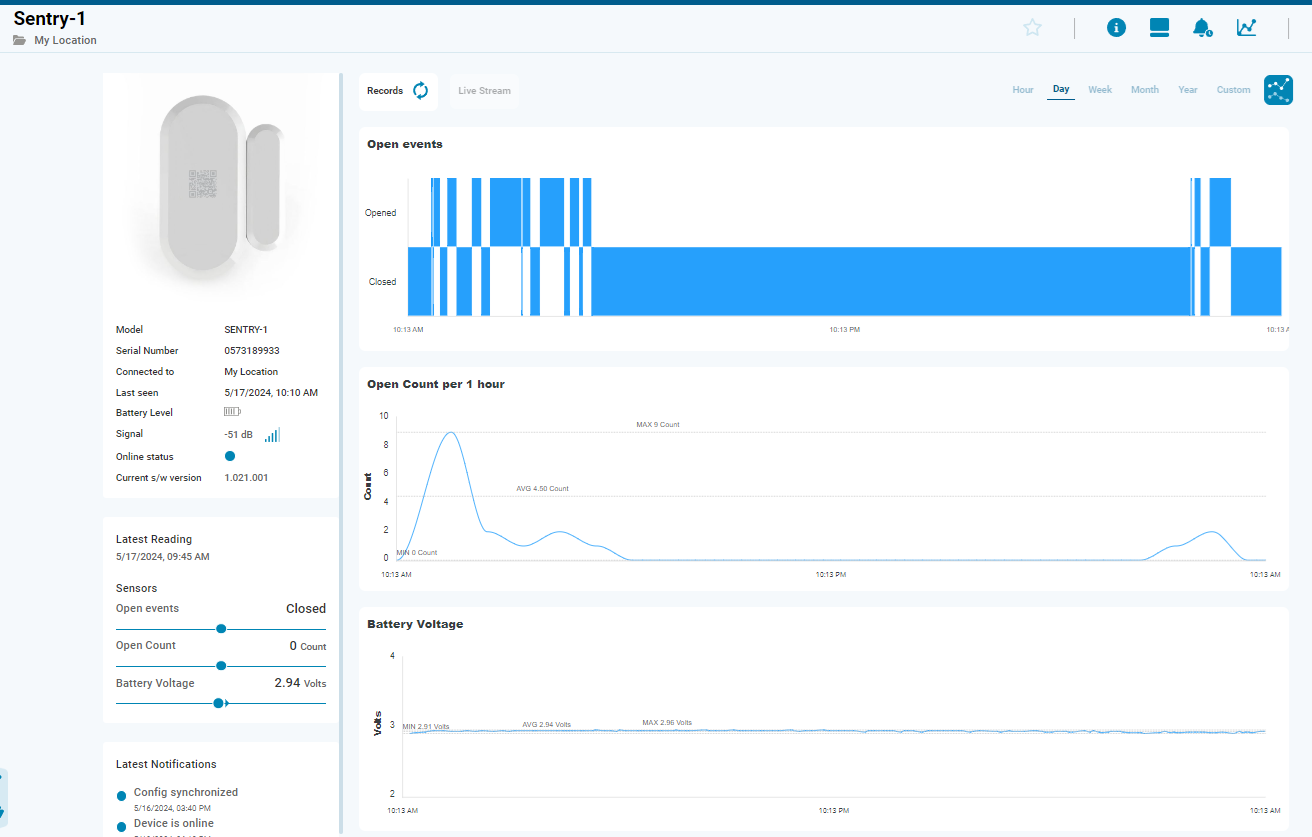
You can view the activity results on the Device Details page. The following screen capture shows an example of the activity during a daily monitor of an entrance to a building.
Conclusion
Setting up Sentry notifications for different use cases is vital to ensure optimal performance and responsiveness of your iMatrix system. By carefully configuring the notification settings, you can tailor alerts to match the specific needs of your environment, whether it’s monitoring a freezer door, an airport retail kiosk, or the activity of a frequently used entrance. Through the web UI or mobile app, users can easily customize their notification preferences to receive timely alerts via email, SMS, or other planned methods like voice calls and WhatsApp.
You can ensure that your Sentry sensors provide accurate and valuable data by following the outlined steps for device notification settings, such as setting alarm high limits, using threshold qualifications, and monitoring open counts per period. This capability enhances the iMatrix system’s functionality and maximizes the sensor’s battery life, ensuring long-term reliability and efficiency.