Calibrating Neo Sensors – Temperature
Our Neo sensors are created to achieve a high degree of accuracy in all readings. However, all equipment eventually needs some maintenance over time to remain as accurate as possible. Can you calibrate your own Neo sensor at home? The good news is, yes. You can calibrate your sensors at home, by means of a couple different methods.
This guide will show you how to recalibrate our Neo sensors for the highest possible accuracy.
Method 1: Ice Water
Ice, by definition, is frozen. This means that if there’s ice, you know the temperature is 0 degrees Celsius, or 32 degrees Fahrenheit. This is a reliable standard by which you can measure your sensor’s accuracy, and adjust it for calibration as needed.
This method works for all Neo sensors, although the steps vary slightly. If you have both the Neo 1 and Neo-P, you can still calibrate both to save time.
Materials:
- Bowl or pitcher
- Ice and cold water to fill the container
- Your Neo sensor
- The iMatrix app
When you choose your container, make sure that it’s sufficiently deep enough to fill with ice and water, as well as place your sensor in.
Fill your pitcher with a 50/50 mixture of both ice and water. Allow the ice water to settle for a few moments (and to allow the ice to cool the water enough to use for calibration).
For the Neo-P:
Place the probe in the ice water. Be sure to avoid placing the sensor itself in the water. Allow the probe to sit in the water for several moments to read the temperature.
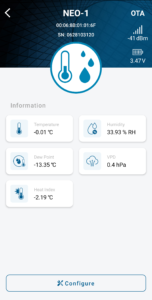
In the iMatrix app, you should see updated readings for your sensor. If your sensor is not currently transmitting readings, press the button on the back of your sensor and make sure the blue light flashes on the front of the sensor. Press the refresh option within the iMatrix app. Your sensor should now show up with updated readings.
If your Neo-P isn’t showing a reading of freezing temperatures (either 0C or 32F), make sure the probe is in the ice water, and surrounded by an even mixture of both ice and water. Refresh your device and check again for updated readings.
You should now see a reading close to freezing temperatures. Select the Calibrate option in your app. You will see different points to offset the reading, which will calibrate your sensor. Using multiple points for calibration is useful if you need to take measurements based on different standards. However, to recalibrate your sensor to register freezing temperatures, you only need to use the 1 Point calibration option.
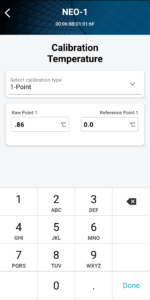 In the calibration settings, there are two places to enter values. The first place is where you enter the current reading from the sensor. This essentially tells your sensor how far off it is from an accurate reading. Next, enter your standard (known temperature) in the second spot. This tells your sensor what it should be registering, so enter 0.00.
To double check your calibration, remove the probe from the ice water and allow it to return to room temperature. Repeat the process of placing the probe in the ice water and ensure that the sensor is showing readings of either 0C or 32F (or very close to those values).
The process for calibrating the Neo 1 is similar to that of the Neo-P. However, the Neo 1 should not be fully submerged to avoid damage. To calibrate your Neo sensor without damaging it, you’ll need to place it in a watertight bag (such as a Ziploc bag). Before sealing the bag, try to remove as much air as possible.
Fill a pitcher or bowl with half ice, and half cold water. Let the mixture sit for a few moments, and seal your Neo 1 in the plastic bag. When placing your sensor in the ice water, we recommend placing it so that the (sealed) opening of the bag is above the water line just in case there are any leaks.
Open the iMatrix application and check for current readings from your sensor. If your sensor isn’t displaying, briefly press the button on the back of the sensor and refresh your application. Now you should be able to see your sensor and select it to see the most current temperature readings. Because the ice water is freezing, the ideal reading will reflect that. However, if the reading doesn’t show 0C or 32F, you’ll need to calibrate it to adjust the readings.
As with calibrating the Neo-P, you’ll need to verify the discrepancy in the readings versus the known temperature of the ice water (freezing). Open the calibration settings and enter the known value and the base value. Your known value is the temperature of the ice water, which you’ll see in the second spot. The first area to enter a value is where you enter the current reading from your sensor.
For example, if your sensor reads 0.08C, then enter that number in the first spot. In the second spot, you should enter the value that your sensor should be reading, which is 0.00. Next, press the button on the back of your sensor and refresh your app to verify the new readings on your sensor. Now, your sensor should show an updated reading within close range to zero, or freezing temperatures.