All sensors rely on accurate calibration to deliver proper measurements. The Neo sensors measure humidity by sensing moisture in the surrounding air. However, any device sometimes needs recalibration to maintain accurate readings. There are multiple methods you can use to calibrate your sensor for humidity. In this guide, we’ll go through the most common and reliable calibration methods.
Method 1: Salt Calibration
Many salts have known relative humidity values, given a specific temperature. Salts will absorb water, and release humidity into the air around them. Table salt (aka Sodium Chloride or NaCl), is one of the most commonly used salts for testing calibration. Adding a small amount of water to the proper amount of table salt will produce a RH of about 75%.
However, this reading of 75% is in the medium to upper range for humidity. You can use a single salt to calibrate. Calibrating your device based on a single salt or reading is not as accurate as using multiple salts (with their different humidity levels) to measure humidity at different points. The best way to achieve the most accurate calibration is by choosing a salt with high humidity, and one with a significantly lower humidity.
This chart details common salts and their known relative humidity at specific temperatures:
Relative humidity of salts at a given temperature
Salt
15℃
20℃
25℃
30℃
35℃
Magnesium Chloride
33
33
33
32
32
Potassium Nitrate
95
95
94
92
91
Potassium Sulfate
98
98
97
97
97
Sodium Chloride
76
75
75
75
75
Lithium Chloride
11
11
11
11
11
Table salt is widely available, and chances are, you don’t even need to go to the store to get some. However, many of these salts will need to be ordered or purchased from your local hardware or plant store. Many of these salts are used in fertilizer mixtures.
Whichever salts you choose, the calibration process is the same. Get an airtight container, or ziploc bag. Put your salts in a small ramekin or lid, and add a small amount of distilled water. The idea is not to dissolve your salt, but rather just to wet it. You should have a slushy looking mixture.
Note: Using distilled water is recommended, but not required to use this method. Purified or distilled water simply has less contaminants, which means there are less things that can potentially interfere with the salt’s RH.
Place the container of salt in your container or plastic bag. Next, put your sensor in the container, making sure it does not come into contact with the salt mixture. Close your container with both the salt and sensor inside. If you’re using a plastic bag, you don’t need to try and press air out of the bag.
Write down the time when you close the container and let it sit for several hours. Some people prefer to allow the salt and sensor to sit for up to 24 hours or longer. However, four to six hours is sufficient in most cases.
After you’ve waited long enough, open your iMatrix app and press the button on the back of your sensor to get your new readings. Ideally, your sensor should show a reading close to that of your salt’s expected RH. If your sensor isn’t displaying accurate readings, open the Calibrate screen.
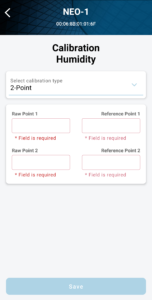
Depending on how many salts you choose to calibrate with, your next choice will vary. If you’re only calibrating using one salt, choose the ‘1 Point’ option. If you’re using two salts, choose the ‘2 Point’ option, and so on. Basically you need a point for each salt you’re using.
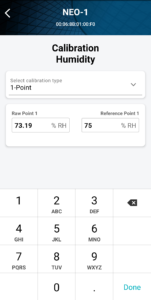
1 point humidity calibration
For each point you calibrate, there are two boxes to enter values. The first box is where you’ll enter the current humidity reading from your Neo sensor. The second box is where you’ll enter the known relative humidity of the salt you’re using. Then, save your settings and refresh your app to show the calibrated readings.
2 point calibration screen
Note: to complete two point calibration, you can also start with a single point calibration. The application will automatically populate the boxes for the first point of calibration if you complete the 1 point calibration first and choose to do a multi-point calibration later.
Allow your sensor a few seconds to display the new reading to verify its accuracy.
This short video shows you the process for entering calibration values in the iMatrix mobile app:
Method 2: Calibrated Hygrometer
The next method can be used for calibrating relative humidity as well as temperature. While it is somewhat more simple than the salt method, it does require a highly accurate device to measure your sensor against.
You need a hygrometer (or if you’re calibrating temperature, a thermometer) that you know is already correctly calibrated and capable of reading conditions with a high level of accuracy. Entering the calibration values works exactly the same as when you use the salt method. The difference is that instead of using the known relative humidity of a salt, you simply use the readings from the device.
For single point calibration, you only need to take the readings from your sensor and enter them in the first box in the calibration section. Then, enter the calibrated hygrometer’s readings in the second box. Save your settings and allow your sensor to have a few moments to refresh and display the new readings.
If you want to do a multi-point calibration with this method, you can. However, you will need to expose both the hygrometer and your Neo sensor to different levels of humidity. You can achieve these conditions in a variety of different ways. If you have readily available humid and dry conditions near you, you can use each for a calibration point for your sensors. Another way to create these conditions is by using a humidifier and dehumidifier to create extremes for both humidity and dryness.
We use cookies to help us to improve and enhance our site navigation and enable us to deliver the best customer experience. By clicking "Accept All" you are agreeing to the storing of ALL cookies on your device. However, you may visit "Cookie Settings" to provide a controlled consent.
This website uses cookies to improve your experience while you navigate through the website. Out of these, the cookies that are categorized as necessary are stored on your browser as they are essential for the working of basic functionalities of the website. We also use third-party cookies that help us analyze and understand how you use this website. These cookies will be stored in your browser only with your consent. You also have the option to opt-out of these cookies. But opting out of some of these cookies may affect your browsing experience.
Necessary cookies are absolutely essential for the website to function properly. These cookies ensure basic functionalities and security features of the website, anonymously.
Cookie
Duration
Description
cookielawinfo-checkbox-analytics
11 months
This cookie is set by GDPR Cookie Consent plugin. The cookie is used to store the user consent for the cookies in the category "Analytics".
cookielawinfo-checkbox-functional
11 months
The cookie is set by GDPR cookie consent to record the user consent for the cookies in the category "Functional".
cookielawinfo-checkbox-necessary
11 months
This cookie is set by GDPR Cookie Consent plugin. The cookies is used to store the user consent for the cookies in the category "Necessary".
cookielawinfo-checkbox-others
11 months
This cookie is set by GDPR Cookie Consent plugin. The cookie is used to store the user consent for the cookies in the category "Other.
cookielawinfo-checkbox-performance
11 months
This cookie is set by GDPR Cookie Consent plugin. The cookie is used to store the user consent for the cookies in the category "Performance".
viewed_cookie_policy
11 months
The cookie is set by the GDPR Cookie Consent plugin and is used to store whether or not user has consented to the use of cookies. It does not store any personal data.
Functional cookies help to perform certain functionalities like sharing the content of the website on social media platforms, collect feedbacks, and other third-party features.
Performance cookies are used to understand and analyze the key performance indexes of the website which helps in delivering a better user experience for the visitors.
Analytical cookies are used to understand how visitors interact with the website. These cookies help provide information on metrics the number of visitors, bounce rate, traffic source, etc.
Advertisement cookies are used to provide visitors with relevant ads and marketing campaigns. These cookies track visitors across websites and collect information to provide customized ads.
 Depending on how many salts you choose to calibrate with, your next choice will vary. If you’re only calibrating using one salt, choose the ‘1 Point’ option. If you’re using two salts, choose the ‘2 Point’ option, and so on. Basically you need a point for each salt you’re using.